
오늘은 인덱스 페이지에 이어서 회원가입 페이지를 구현할 것이다!
[joinView.do]
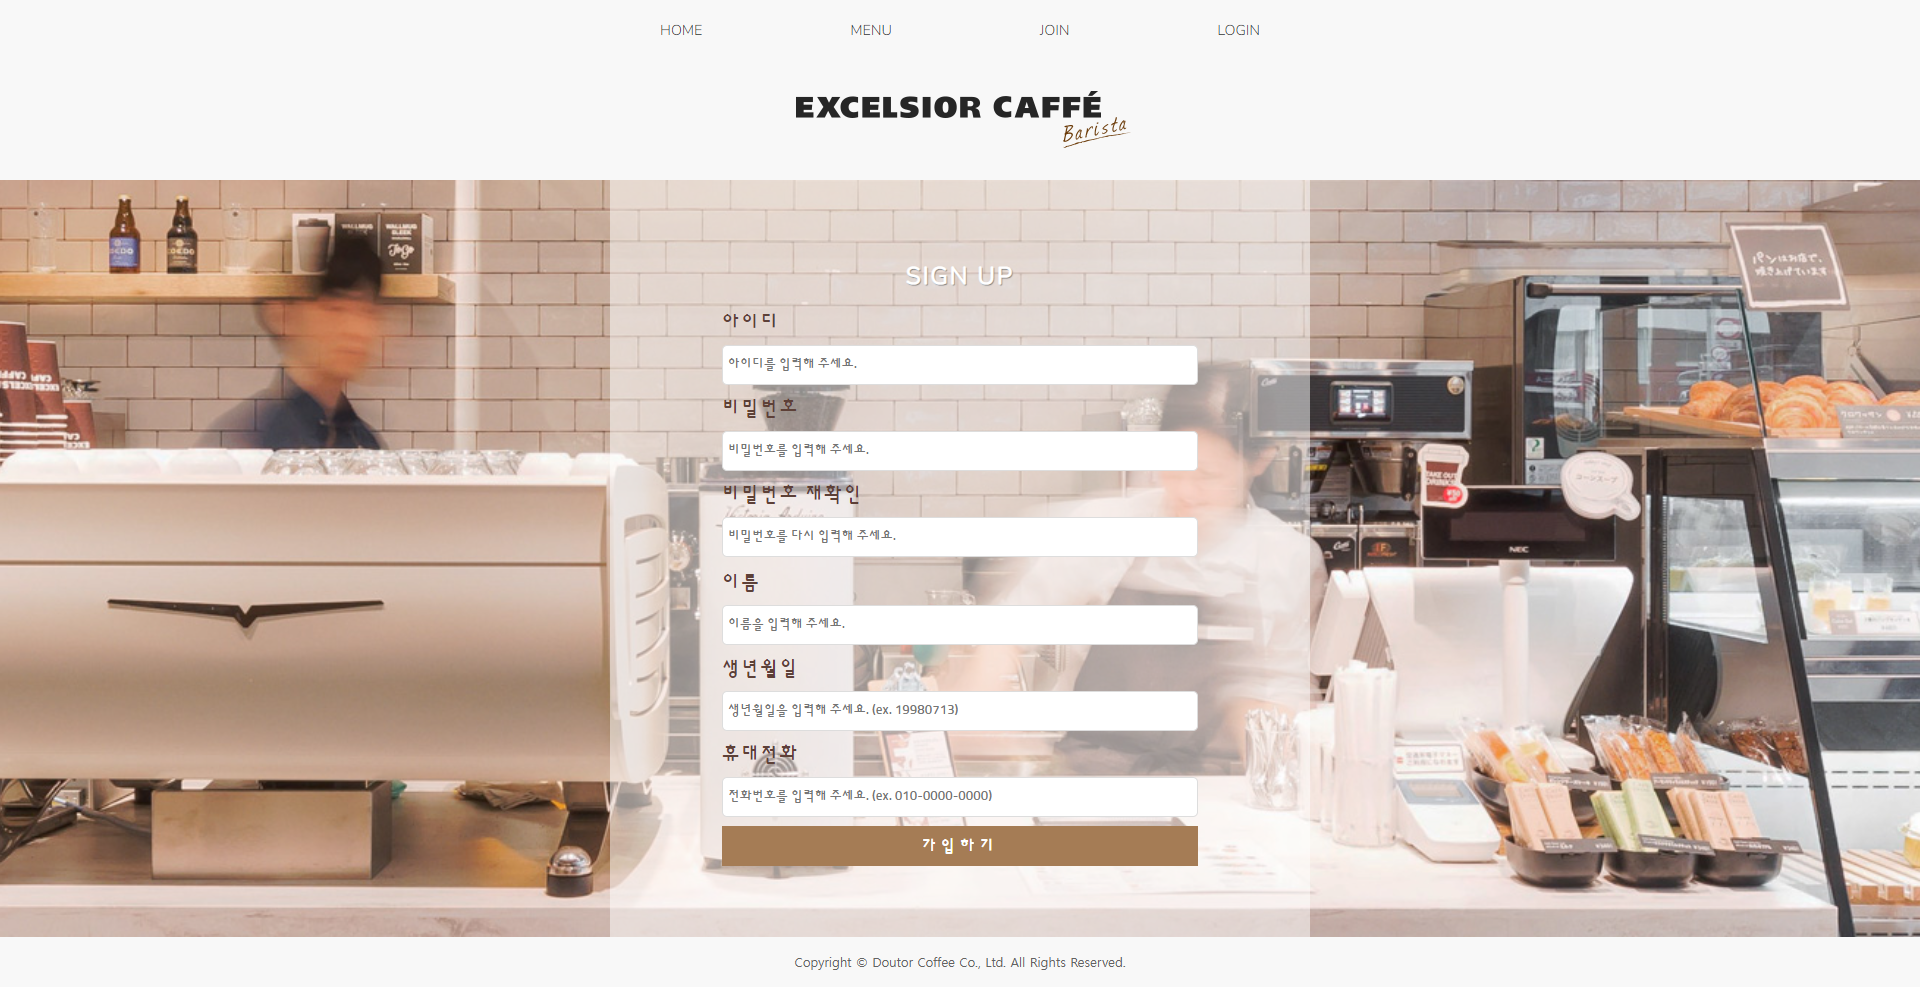
일단 회원가입 할 때 입력하는 정보로는 아이디, 비밀번호, 이름, 생년월일, 전화번호 이렇게 간단하게 5가지로 설계했다.
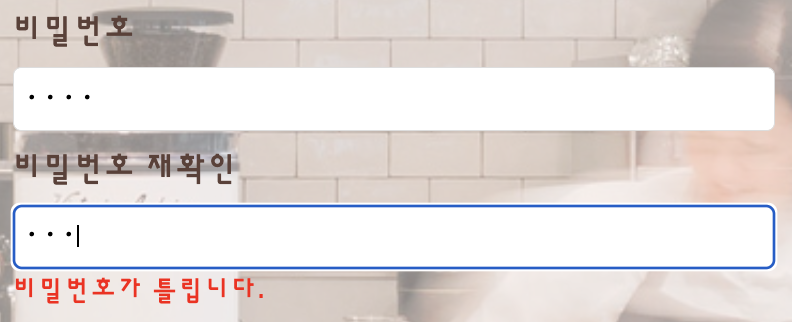
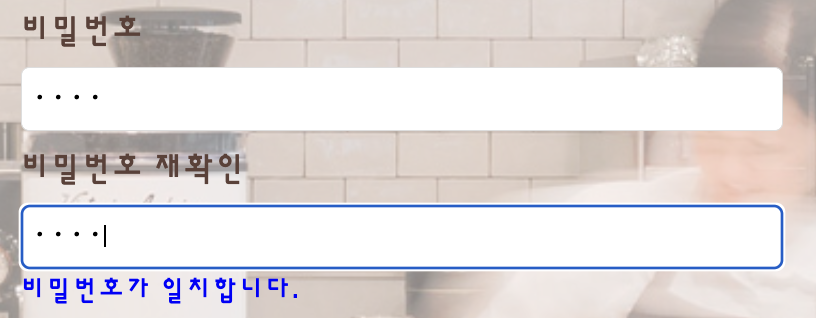
그리고 자바스크립트를 통해서 유효성검사를 추가했고 비밀번호 재입력은 두 개의 값이 일치하면 innerText로 '비밀번호가 일치/불일치 합니다.' 가 표시되게 했다.
[joinOk.js]
/*joinOk.js*/

const joinForm=document.querySelector('#joinForm');
const userId=document.querySelector('#userId');
const userPw=document.querySelector('#userPw');
const userPw2=document.querySelector('#userPw2');
const userName=document.querySelector('#userName');
const userBirthday=document.querySelector('#userBirthday');
const userPhone=document.querySelector('#userPhone');
const joinOkBtn=document.querySelector('#joinOkBtn');

//비밀번호 체크
userPw2.addEventListener('keyup',()=>{
	if(userPw.value!=userPw2.value) {
		pwch.innerText="비밀번호가 틀립니다.";
		pwch.classList.remove('pwch2');
	} else {
		pwch.innerText="비밀번호가 일치합니다.";
		pwch.classList.add('pwch2');
	}
});

//유효성 검사
joinOkBtn.addEventListener('click', ()=>{
	if(userId==null || userId.value=="" || userId.value<=0) {
		alert("아이디를 입력하세요!");
		userId.focus();
		return false;
	}
	if(userPw==null || userPw.value=="" || userPw.value<=0) {
		alert("비밀번호를 입력하세요!");
		userPw.focus();
		return false;
	}
	if(userPw2==null || userPw2.value=="" || userPw2.value<=0) {
		alert("비밀번호를 입력하세요!");
		userPw2.focus();
		return false;
	}
	if(userPw.value!=userPw2.value) {
		alert("비밀번호가 일치하지 않습니다.");
		userPw2.focus();
		return false;
	}
	if(userName==null || userName.value=="" || userName.value<=0) {
		alert("이름을 입력하세요!");
		userName.focus();
		return false;
	}
	if(userBirthday==null || userBirthday.value=="" || userBirthday.value<=0) {
		alert("생년월일을 입력하세요!");
		userBirthday.focus();
		return false;
	}
	if(userPhone==null || userPhone.value=="" || userPhone.value<=0) {
		alert("전화번호를 입력하세요!");
		userPhone.focus();
		return false;
	}

	alert("회원가입 실행!");
	joinForm.submit();

});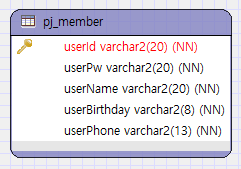
테이블은 전부 String(문자열) 타입, not null로 userId에 기본키를 설정했다.
[MemberDto]
package org.project.dto;
	//DataBase Transfer Object
public class MemberDto {

	//필드
	private String userId;
	private String userPw;
	private String userName;
	private String userBirthday;
	private String userPhone;

	//생성자
	public MemberDto(String userId, String userPw, String userName, String userBirthday, String userPhone) {
		super();
		this.userId = userId;
		this.userPw = userPw;
		this.userName = userName;
		this.userBirthday = userBirthday;
		this.userPhone = userPhone;
	}

	//getter, setter 메소드
	public String getUserId() {return userId;}

	public void setUserId(String userId) {this.userId = userId;}

	public String getUserPw() {return userPw;}

	public void setUserPw(String userPw) {this.userPw = userPw;}

	public String getUserName() {return userName;}

	public void setUserName(String userName) {this.userName = userName;}

	public String getUserBirthday() {return userBirthday;}

	public void setUserBirthday(String userBirthday) {this.userBirthday = userBirthday;}

	public String getUserPhone() {return userPhone;}

	public void setUserPhone(String userPhone) {this.userPhone = userPhone;}

}접근제한자는 전부 private로 선언하고 getter, setter 메소드로 가져왔다.
DTO(DataBase Transfer Object) : 데이터 전송 객체, 비즈니스 로직을 포함하지 않는 단순한 데이터 구조
[Controller]
package org.project.controller;

import java.io.IOException;

import javax.servlet.RequestDispatcher;
import javax.servlet.ServletException;
import javax.servlet.annotation.WebServlet;
import javax.servlet.http.HttpServlet;
import javax.servlet.http.HttpServletRequest;
import javax.servlet.http.HttpServletResponse;

import org.project.commend.DeleteOkCommend;
import org.project.commend.ExcuteCommend;
import org.project.commend.JoinOkCommend;
import org.project.commend.LoginOkCommend;
import org.project.commend.LogoutCommend;
import org.project.commend.MemberViewCommend;
import org.project.commend.UpdateOkCommend;

@WebServlet("*.do")
public class Controller extends HttpServlet {
	private static final long serialVersionUID = 1L;

	protected void doGet(HttpServletRequest request, HttpServletResponse response)
			throws ServletException, IOException {
		request.setCharacterEncoding("UTF-8");

		String path=request.getContextPath();
		// => /webProject_KM
		String uri=request.getRequestURI();
		// => /webProject_KM/index.do
		String basicURL=uri.substring(path.length());
		// => /index.do

		System.out.println(basicURL);

		ExcuteCommend commend=null;

		String url="";

		if(basicURL.equals("/index.do")) {
			url="/index.jsp";
		} else if(basicURL.equals("/loginView.do")) {
			url="/loginView.jsp";
		} else if(basicURL.equals("/joinView.do")) {
			url="/joinView.jsp";
		} else if(basicURL.equals("/joinOk.do")) {
			commend=new JoinOkCommend();
			commend.excuteQueryCommend(request, response);
			url=(String)request.getAttribute("url");
		}
		RequestDispatcher disp=request.getRequestDispatcher(url);
		disp.forward(request, response);
	}

	protected void doPost(HttpServletRequest request, HttpServletResponse response)
			throws ServletException, IOException {
		request.setCharacterEncoding("UTF-8");
		doGet(request, response);
	}
}View로 이동만 시켜주는건 바로 url로 연결시키고 Form에서 submit되어서 넘어온건 커맨드 만들어서 처리한다.
[joinView.jsp]
<%@ page language="java" contentType="text/html; charset=UTF-8"
    pageEncoding="UTF-8"%>
<!DOCTYPE html>
<html>
<head>
<meta charset="UTF-8">
<title>Join page</title>
<link rel="stylesheet" href="css/join.css" />
<script src="js/joinOk.js" defer></script>
</head>
<body>
	<%@include file="common/header.jsp" %>
	<div class="container">
		<div class="inner-con">
			<div class="join">
				<form action="joinOk.do" method="post" id="joinForm">
					<table>
						<thead>
							<tr>
								<th>SIGN UP</th>
							</tr>
						</thead>
						<tbody>
							<tr>
								<td>
									<label for="userId">아이디</label> <br />
									<input type="text" name="userId" id="userId" placeholder="아이디를 입력해 주세요." />
								</td>
							</tr>
							<tr>
								<td>
									<label for="userPw">비밀번호</label> <br />
									<input type="password" name="userPw" id="userPw" placeholder="비밀번호를 입력해 주세요." />
								</td>
							</tr>
							<tr>
								<td>
									<label for="userPw2">비밀번호 재확인</label> <br />
									<input type="password" name="userPw2" id="userPw2" placeholder="비밀번호를 다시 입력해 주세요." />
								</td>
							</tr>
							<tr>
								<td>
									<span id="pwch" class="pwch2"></span>
								</td>
							</tr>
							<tr>
								<td>
									<label for="userName">이름</label> <br />
									<input type="text" name="userName" id="userName" placeholder="이름을 입력해 주세요." />
								</td>
							</tr>
							<tr>
								<td>
									<label for="userBirthday">생년월일</label> <br />
									<input type="text" name="userBirthday" id="userBirthday" placeholder="생년월일을 입력해 주세요. (ex. 19980713)" />
								</td>
							</tr>
							<tr>
								<td>
									<label for="userPhone">휴대전화</label> <br />
									<input type="text" name="userPhone" id="userPhone" placeholder="전화번호를 입력해 주세요. (ex. 010-0000-0000)" />
								</td>
							</tr>
						</tbody>
						<tfoot>
							<tr>
								<td>
									<input type="button" value="가입하기" id="joinOkBtn" />
								</td>
							</tr>
						</tfoot>
					</table>
				</form>
			</div>
		</div>
	</div>
	<%@include file="common/footer.jsp" %>
</body>
</html>/*join.css*/
@import url("common/reset.css");
@import url("common/header.css");
@import url("common/footer.css");
@import url('https://fonts.googleapis.com/css2?family=Nunito:wght@300&display=swap');
@import url('https://fonts.googleapis.com/css2?family=Sunflower:wght@500&display=swap');
.container {
width: 100%;
height: calc(100vh - 180px);
}
.inner-con {
width: 100%;
height: calc(100vh - 180px);
background-image: url("../img/ekuse4.jpg");
background-repeat: no-repeat;
background-size: cover;
background-position: bottom;
display: flex;
justify-content: center;
}
.join {
background: rgba(255, 255, 255, 0.5);
width: 700px;
display: flex;
align-items: center;
justify-content: center;
}
.join > form > table {
margin-left: auto;
margin-right: auto;
padding: 10px 10px;
width: 500px;
font-family: 'Sunflower', sans-serif;
letter-spacing: 2px;
}
.join > form > table thead tr th {
color: white;
text-shadow: 1px 1px 1px gray;
font-size: 1.5em;
line-height: 50px;
font-family: 'Nunito', sans-serif;
}
.join > form > table tbody label {
line-height: 40px;
font-size: 1.2em;
color: #5d4037;
}
.join > form > table tbody input {
width: 100%;
height: 40px;
border: 1px solid #ddd;
border-radius: 5px;
padding: 2px 5px;
margin: 2px 0px;
font-family: 'Sunflower', sans-serif;
}
#pwch {
color: red;
}
.pwch2 {
color: blue !important;
}
.join > form > table tfoot input {
width: 100%;
height: 40px;
border: none;
background-color: #A57C55;
color: #FFFFFF;
font-family: 'Sunflower', sans-serif;
letter-spacing: 5px;
font-size: 1em;
margin-top: 5px;
}
.join > form > table tfoot hr {
margin: 10px 0px;
}
.join > form > table tfoot a {
color: #f3eee9;
text-shadow: 2px 2px 2px gray;
float: right;
}원래 실제로 프로젝트를 작업할땐 DB연결이나 DAO에서 기능을 담당하는 로직을 먼저 작성하는데 지금은 완성된 프로젝트로 정리하며 포스팅하는거라 순서가 좀.. 이상하다 ㅎㅎ...
일단 포스팅 상으론 프론트는 끝났기 때문에 이제 백엔드 기능을 하나하나 가져와서 정리를 합쉬다~!!
Form의 데이터를 DB로 넘겨서 작업을 하려면 가장 먼저 데이터베이스와 연결을 해야한다.
DB는 학원에서 오라클을 사용하기 때문에 오라클을 사용해서 작업한다.
[DBConnect]
package org.project.dbConnect;

import java.sql.Connection;
import java.sql.DriverManager;
import java.sql.SQLException;

import javax.naming.Context;
import javax.naming.InitialContext;
import javax.naming.NamingException;
import javax.sql.DataSource;

//JDBC 연결 클래스 생성
public class DBConnect {

	//static method(정적 메소드) getConnection()
	//객체 생성없이 클래스를 통해 메서드를 직접 호출할 수 있다.
	public static Connection getConnection() throws NamingException, SQLException {

		//데이터베이스와 연결하는 객체
		Connection conn=null;

//		String driver="oracle.jdbc.driver.OracleDriver"; //JDBC Driver Class
//		//DB연결을 위한 정보
//		String url="jdbc:oracle:thin:@localhost:1521:xe";
//		String user="system";
//		String password="1234";
//
//		try {
//			//JDBC 드라이버 로딩
//			Class.forName(driver);
//
//			System.out.println("Driver Ok");
//			//Connection 객체 생성
//			conn=DriverManager.getConnection(url, user, password); //데이터베이스 연결
//			System.out.println("DB Connect Ok");
//		} catch(ClassNotFoundException e) {
//			e.printStackTrace();
//			System.out.println("Driver No");
//		} catch(SQLException e) {
//			e.printStackTrace();
//			System.out.println("DB Connect No");
//		}

		DataSource dataSource;
		Context context=new InitialContext();
		dataSource=(DataSource)context.lookup("java:comp/env/jdbc/oracleDB");
		conn=dataSource.getConnection();

		return conn;
	}
}중간에 커넥션풀을 배워서 코드를 수정했다!
기존에 사용하던 방법(주석 처리된 부분)은 사용자가 요청을 할 때마다 DB에 직접 연결해서 JDBC Driver를 로드하고 커넥션 객체를 생성하여 연결하고 종료하기 때문에 비효율적이다.
그래서! 효율적인 자원 관리를 위해 커넥션 풀 사용했다.
커넥션 풀에 관한 내용은 따로 정리할 예정이다
[ProjectDao - insertDo (회원가입) ]
package org.project.dao;

import java.sql.Connection;
import java.sql.PreparedStatement;
import org.project.dbConnect.DBConnect;

//DataBase Access Object
public class ProjectDao {

	//싱글톤
	//클래스가 최초 한번만 메모리를 할당하고(Static) 그 메모리에 객체를 만들어 사용하는 디자인 패턴

	//생성자를 외부에서 호출할 수 없도록  private 접근제한자
	private static class singleton {
		//정적 필드 static final => 한 번 초기값이 저장되면 변경 불가
		private static final ProjectDao INSTANCE=new ProjectDao();
	}

	//생성자
	private ProjectDao() {}

	//외부 호출이 가능(public) 정적(static) 메소드
	public static ProjectDao getInstance() {
		return singleton.INSTANCE;
	}

	//회원가입
	public int  insertDo(String userId, String userPw, String userName,
			String userBirthday, String userPhone) {
		int rs=0;

		Connection conn=null;
		PreparedStatement pstm=null;
		String query="";

		try {
			conn=DBConnect.getConnection();
			query="insert into pj_member values (?,?,?,?,?)";
			pstm=conn.prepareStatement(query);
			pstm.setString(1, userId);
			pstm.setString(2, userPw);
			pstm.setString(3, userName);
			pstm.setString(4, userBirthday);
			pstm.setString(5, userPhone);
			rs=pstm.executeUpdate();
		} catch (Exception e) {
			e.printStackTrace();
		} finally {
			try {
				if(conn!=null) conn.close();
				if(pstm!=null) pstm.close();
			} catch (Exception e) {
				e.printStackTrace();
			} finally {}
		}

		return rs;
	}

}Dao는 싱글톤 패턴을 사용했다.
Dao(DataBase Access Object) : 데이터 접근 객체, DB에서 데이터를 조회하거나 조작하는 기능을 전담하도록 만든 오브젝트
싱글톤 패턴을 사용하는 이유
1. 고정된 메모리 영역을 얻으면서 한 번의 new로 인스턴스를 사용하기 때문에 메모리 낭비 방지할 수 있다.
2. 싱글톤으로 만들어진 클래스의 인스턴스는 전역 인스턴스이기 때문에 다른 클래스의 인스턴스들이 데이터를 공유하기 쉽다.
3. DBCP(DataBase Connection Pool)처럼 공통된 객체를 여러 개 생성해서 사용해야 하는 상황에서 많이 사용한다.
[joinOkCommend]
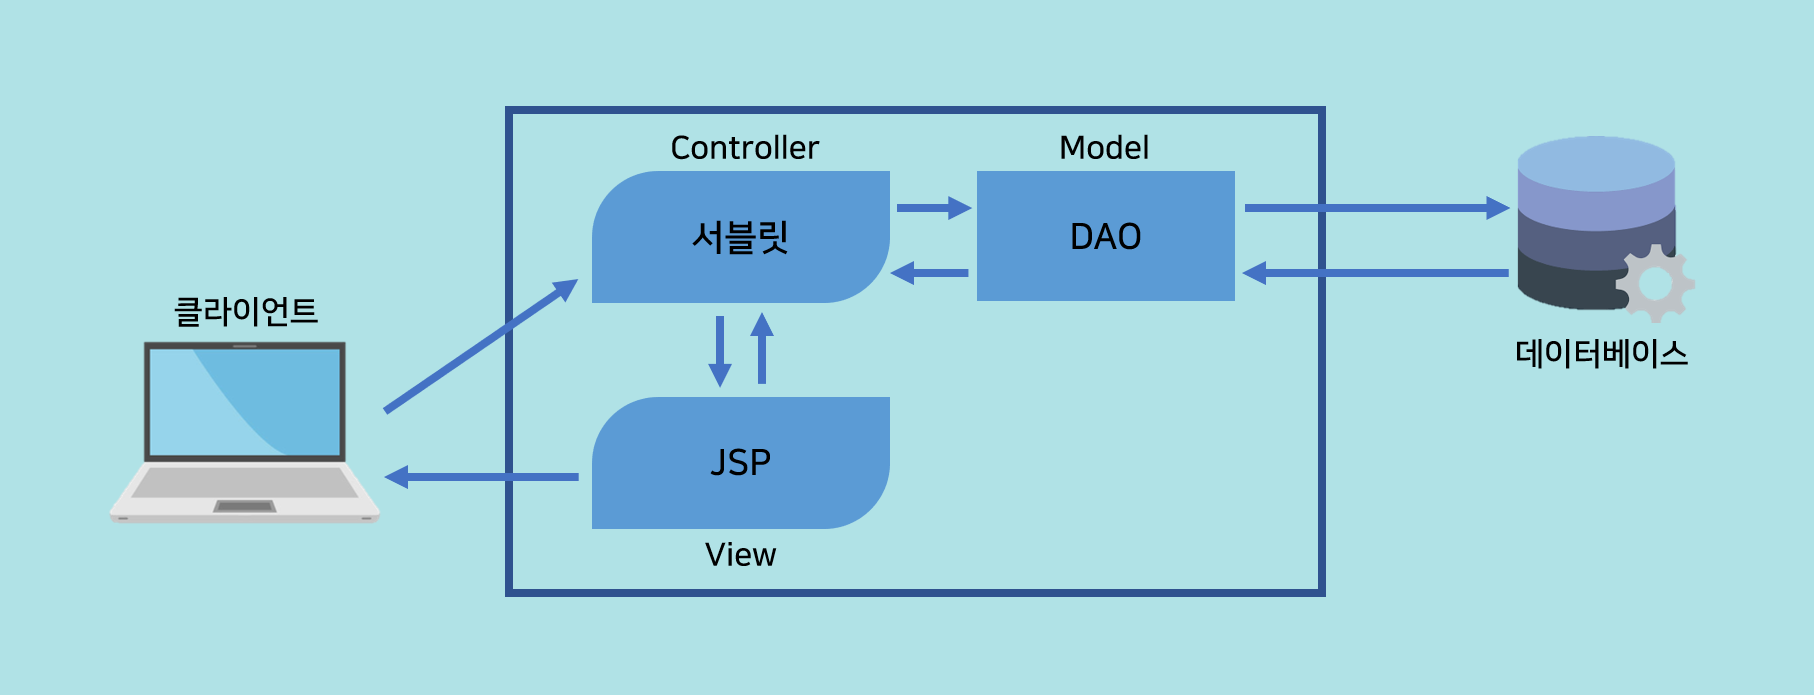
form의 데이터가 submit 되어서 joinOk.do로 날아온다면 컨트롤러에서 받아서 view로 포워딩 시켜준다.
이러한 방식이 MVC Model2 패턴이다. 사진으로 보면 훨씬 이해가 쉽다!
package org.project.commend;

import java.io.IOException;

import javax.servlet.ServletException;
import javax.servlet.http.HttpServletRequest;
import javax.servlet.http.HttpServletResponse;

import org.project.dao.ProjectDao;

public class JoinOkCommend implements ExcuteCommend{

	@Override
	public void excuteQueryCommend(HttpServletRequest request, HttpServletResponse response)
			throws ServletException, IOException {
		System.out.println("회원가입 commend");

		String userId=request.getParameter("userId");
		String userPw=request.getParameter("userPw");
		String userName=request.getParameter("userName");
		String userBirthday=request.getParameter("userBirthday");
		String userPhone=request.getParameter("userPhone");

		ProjectDao dao=ProjectDao.getInstance();

		int rs=dao.insertDo(userId, userPw, userName, userBirthday, userPhone);

		String url="";

		if(rs!=1) {
			System.out.println("회원가입 실패");
			url="/index.jsp";
		} else {
			System.out.println("회원가입 성공");
			url="/loginView.jsp";
		}

		request.setAttribute("url", url);
	}

}Form에서 넘겨받은 파라미터 값을 request 객체를 통해서 가져온다.
그리고 Dao에 있는 insertDo메서드를 통해 DB에 값을 넣는데 << 이 과정에서 에러가 생기면 넘어온 값이 0(null)이라서 콘솔창에 실패가 뜨고 인덱스 페이지로 이동하게 설정했다.
그리고 무사히 넘어간다면 바로 로그인 페이지로 연결했다.
여기서 set된 url을 컨트롤러에서 get해서 이동 시킨다.
여기까지가 회원가입!
다음으론 로그인을 구현할 것이다.
로그인을 통해서 일반회원 / 관리자로 등급을 나누고 관리자의 경우에만 전체 회원 목록을 열람할 수 있게 설계했다.
내가 머리로 아는 것과 그걸 글로 잘 풀어서 설명하는건 너무나 다른 영역인거 같다..
분명 제대로 이해했다고 생각한 부분도 글로 적으려니 어렵게 느껴지고 괜히 이게 맞나 한번 더 검색해보고 ㅋㅋㅋ
그 과정이 공부에 도움이 된다!!
앞으로 꾸준히 블로그로 정리해가면서 지식을 쌓아나가야겠다!
그럼 오늘은 여기까지!!!!
'[개발 언어 & 프레임워크] > JSP' 카테고리의 다른 글
| [JSP] 5. WebProject(홈페이지 만들기) - 회원 탈퇴 구현하기 (0) | 2022.08.15 |
|---|---|
| [JSP] 4. WebProject(홈페이지 만들기) - 회원 상세 조회하기, 회원정보 수정하기 (0) | 2022.08.15 |
| [JSP] 3. WebProject(홈페이지 만들기) - 회원목록 조회하기 (0) | 2022.08.15 |
| [JSP] 2. WebProject(홈페이지 만들기) - 로그인 구현하기 (0) | 2022.08.11 |
| [JSP] 0. WebProject(홈페이지 만들기) - index page (0) | 2022.08.07 |